Import from Excel or Google Sheets
The fastest way to get your people into Oho is a spreadsheet. You fill in Oho's template, connect it once, and Oho creates your workers and starts verifying the credentials you've listed for them. This guide walks through it from start to finish.
Your whole workforce in Oho — each person a worker, with their credentials added and checked — without typing anyone in by hand.
Before you start
You'll need:
- Your list of workers and the credential details you hold for them (names, dates of birth, organisation, card or registration numbers).
- A stable Worker ID for every person — the unique identifier they already have in your HR or payroll system. This is what Oho matches on, so it needs to be there from the first import.
- A spreadsheet in Oho's template format. Alongside an Instructions sheet, the template has four data sheets:
| Sheet | What goes on it |
|---|---|
| Workers | One row per person you employ or engage. |
| Applicants | One row per candidate you're still hiring, before they become a worker. |
| Credentials | One row per card or registration a worker holds. |
| Exemptions | One row per requirement a worker is formally excused from. |
Fill in the sheets you need and leave the others empty — a straightforward workforce import only needs Workers. Don't delete a sheet you're not using: leave it in place with just its headings. Keep the column headings as they come in the template so Oho can read them.
Both work the same way and use the same template. Google Sheets is the simplest if you'd rather not host a file yourself.
Step 1: Fill in the template
Start from Oho's template, which already has the sheets and the right column headings:
⬇ Download the Excel template (.xlsx)Fill in the sheets you need, then save the file (or, for Google Sheets, upload the template to Google Drive and open it as a Sheet).
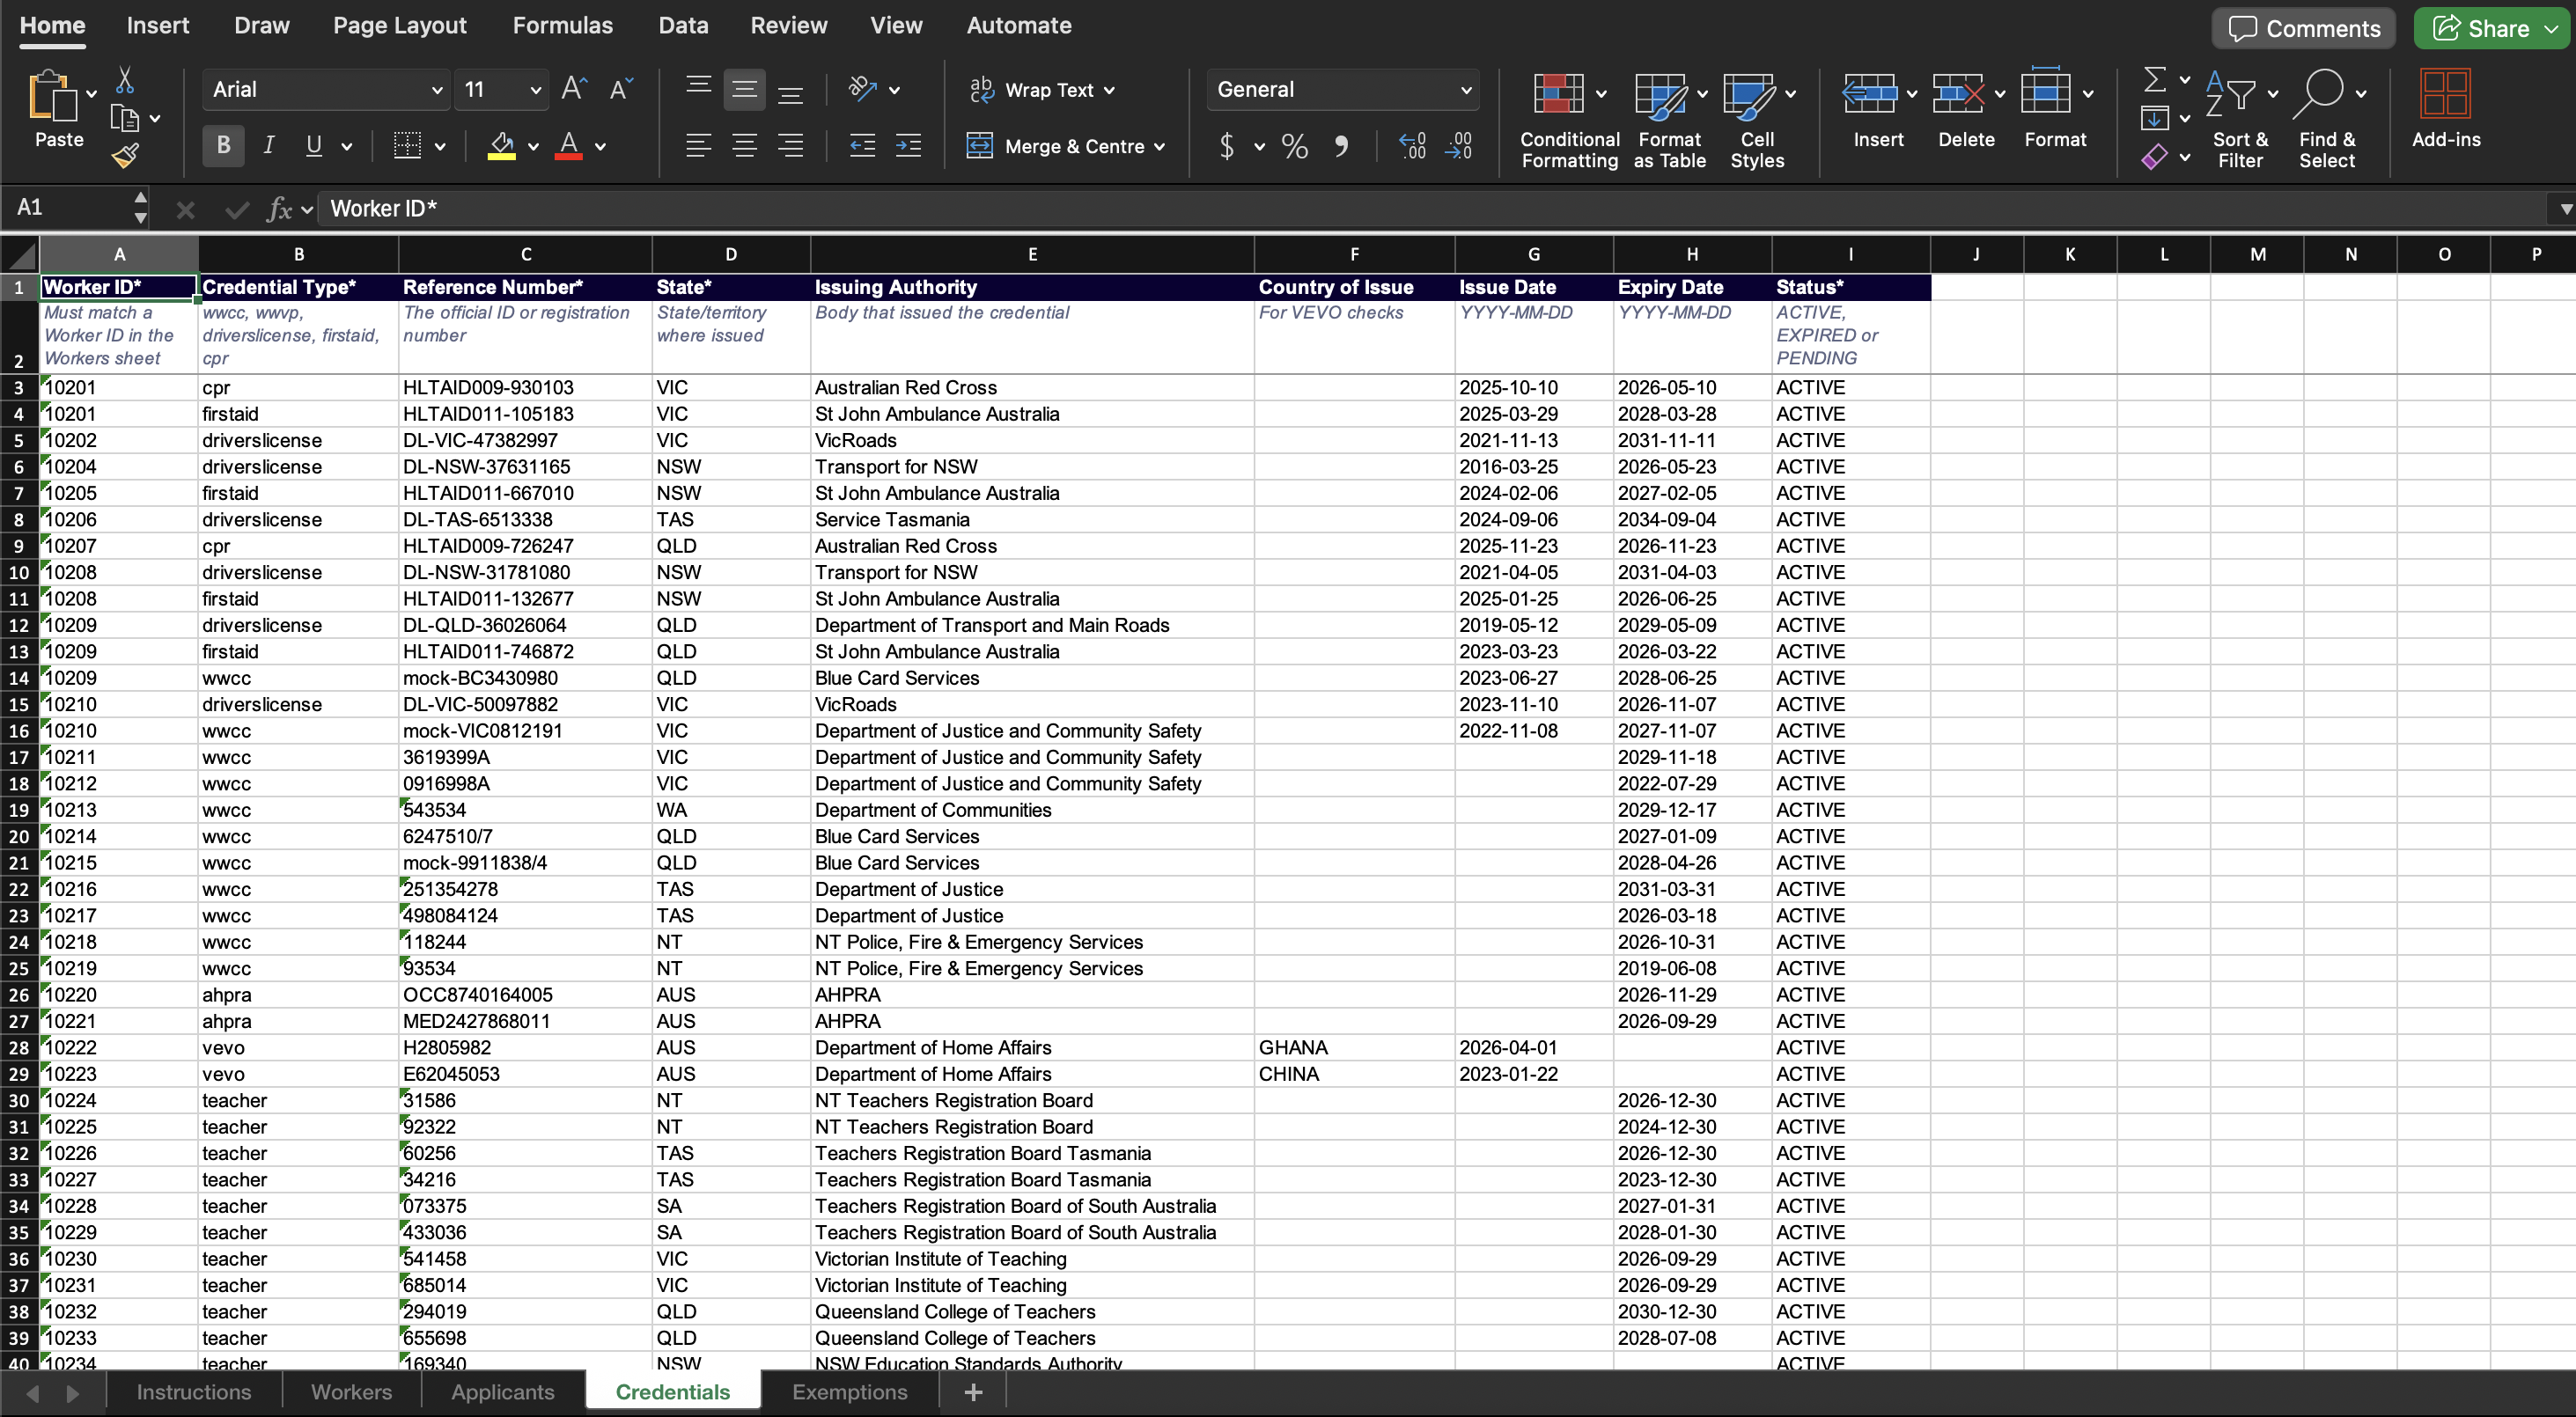
Worker ID is the match key. Oho attaches each credential and exemption row to its worker by matching the Worker ID column — not by email. Use exactly the same Worker ID on the Workers, Credentials and Exemptions sheets, and reuse it on later runs so Oho recognises a returning worker and updates them rather than creating a duplicate. A row with a blank Worker ID can't be linked.
Each sheet's row directly under the headings is a hint row describing what the column expects. Leave it in place — Oho skips it — and start your data on the row below.
Or start from what Oho already holds
On the connection screen in Step 4, under Get the template, there's a second option beside the blank download: export your current data. Pick one or more organisations, click Download, and Oho builds the same four-sheet template already filled in with the workers, applicants, credentials and exemptions it holds for them.
It's the same template, down to the headings, hint row and the words it uses for each value, so you can edit a few cells and upload the file straight back.
Use it when you're putting a tenant that already has data under a spreadsheet, when you want to see what Oho actually holds before changing anything, or as a point-in-time copy of your records. Start from the blank template only when Oho has nothing yet.
Two things to read when the download finishes:
- The sheets you get depend on your access. Workers, Credentials and Exemptions need Continuous access; Applicants needs Recruit. A sheet you can't see is left out, and the page says which. Organisations you aren't assigned to aren't listed at all.
- The dropped-records warning. Some records can't be written as a template row — a credential or exemption type the template has no code for, or a row missing a reference number, worker or issue date that the importer requires. The message names each type and its count. Those records are still in Oho; they just aren't in the file, so don't read the export as a complete inventory.
An export is a good starting file, not a validated one. Before pointing a schedule at it: confirm every Worker ID is unique, compare the row counts with the totals the download reported, and run it once by hand before setting it to recur.
What each sheet needs
Oho only refuses a row when it can't tell who or what the row is about. Everything else imports:
| Sheet | Required — a row without these is skipped | Strongly recommended — the row imports, but you lose something |
|---|---|---|
| Workers | Worker ID, and a name | Organisation, Email, Date of Birth, State, Worker Type, Status |
| Credentials | Worker ID, Credential Type, Reference Number | State, Status |
| Applicants | Applicant ID, and a name | Organisation, Email |
| Exemptions | The same three as Credentials | State — it's what makes the exemption state-specific |
The recommended columns are worth filling in even though nothing blocks you:
- State on a credential row picks the register Oho checks. Without it, a state-issued card may never verify.
- Date of Birth is how several registers match a person. A worker without one may not verify even when their card details are right. An import accepts any valid date — the app's "at least 12 years ago" rule applies only to the Add Worker form, so a mistyped year lands without complaint and shows up later as a check that won't match.
- Email is how Oho reaches a worker or applicant for a check request or a reminder. Volunteers with no email address still import — don't invent one.
- Organisation decides who can see the worker once they're in. The app's Add Worker form requires it; this sheet doesn't, and there's no default — a worker imported without one belongs to no organisation, so only a Super Admin sees them, their credentials inherit the same gap, and any police check row for them is skipped. Leaving Organisation blank has the detail.
- Status left blank counts as active, on both workers and credentials.
Everything else is genuinely optional.
→ Spreadsheet column reference — every column, what it expects, and the exact values Oho accepts.
A worker can have as many credential rows as they hold cards — repeat their Worker ID on each one.
Credential Type takes a fixed set of codes — the clearances and registrations Oho verifies, the documents it tracks for expiry, and any custom credentials you've defined. A row with a code Oho doesn't recognise is skipped, not guessed at. Look your codes up in Credential Type values, which lists every one Oho accepts and whether it's verified against a register.
Applicants and exemptions
Applicants are people you're still considering, who haven't been onboarded as workers yet. Fill in the Applicants sheet if you want to bring a recruitment list in at the same time as your workforce — otherwise leave it blank. Applicants don't take credential rows: their credentials arrive when they complete a Recruitment Check, and when you take an applicant on you promote them to a worker and their credentials carry across. See Applicants.
An exemption records that a worker is formally excused from a requirement — a registered teacher who's exempt from holding a Queensland Blue Card, for example. Exemptions count towards compliance, so a properly exempt worker doesn't also need the underlying card. The Exemptions sheet takes the same columns as Credentials, where Credential Type names the requirement the worker is excused from rather than a card they hold, and State is what makes it specific (wwcc + QLD becomes the Blue Card exemption).
Use that sheet when you're loading a batch of known exemptions alongside your workforce. For one-off exemptions — and where you need to capture a reason and a review-by date — record them on the worker's profile instead: see Record an Exemption.
Keep the column headings exactly as they come in the template so Oho can read them. If a heading is renamed, moved, or removed, Oho can't map that column and those rows won't import.
Check the file before you connect it
Four things account for most first-attempt imports that have to be redone. None of them produce an error — the file loads and the problem shows up later as a worker who looks wrong.
- One row per person on Workers, one row per card on Credentials. Repeat the Worker ID across the credential rows rather than giving someone a second Workers row.
- A given name and a surname on every worker. A single name field imports, but it matches
poorly against registers that compare both. The exception is someone whose legal name is one
word: put it in Last Name, leave First Name empty, and never type a placeholder
like
-into the surname — see People with one name. - Card numbers as text. Excel and Google Sheets drop the leading zeros from a digits-only card number before Oho sees the file. Format the Reference Number column as Text first — see leading zeros disappear in Excel and Google Sheets.
- No reference number used on two different people. Two workers sharing one card number end up sharing one credential record, and only one of them keeps it — see the same reference number on two people.
One thing that isn't on the list: email addresses don't have to be unique, and nothing stops you importing two workers at the same address. It's worth avoiding anyway, because fetch requests and renewal reminders are addressed to the worker, so a shared mailbox means one person receives everybody's.
For more on how each source works, see Excel or Google Sheets. For the full column-by-column detail, see the Spreadsheet column reference.
Step 2: Open Integrations
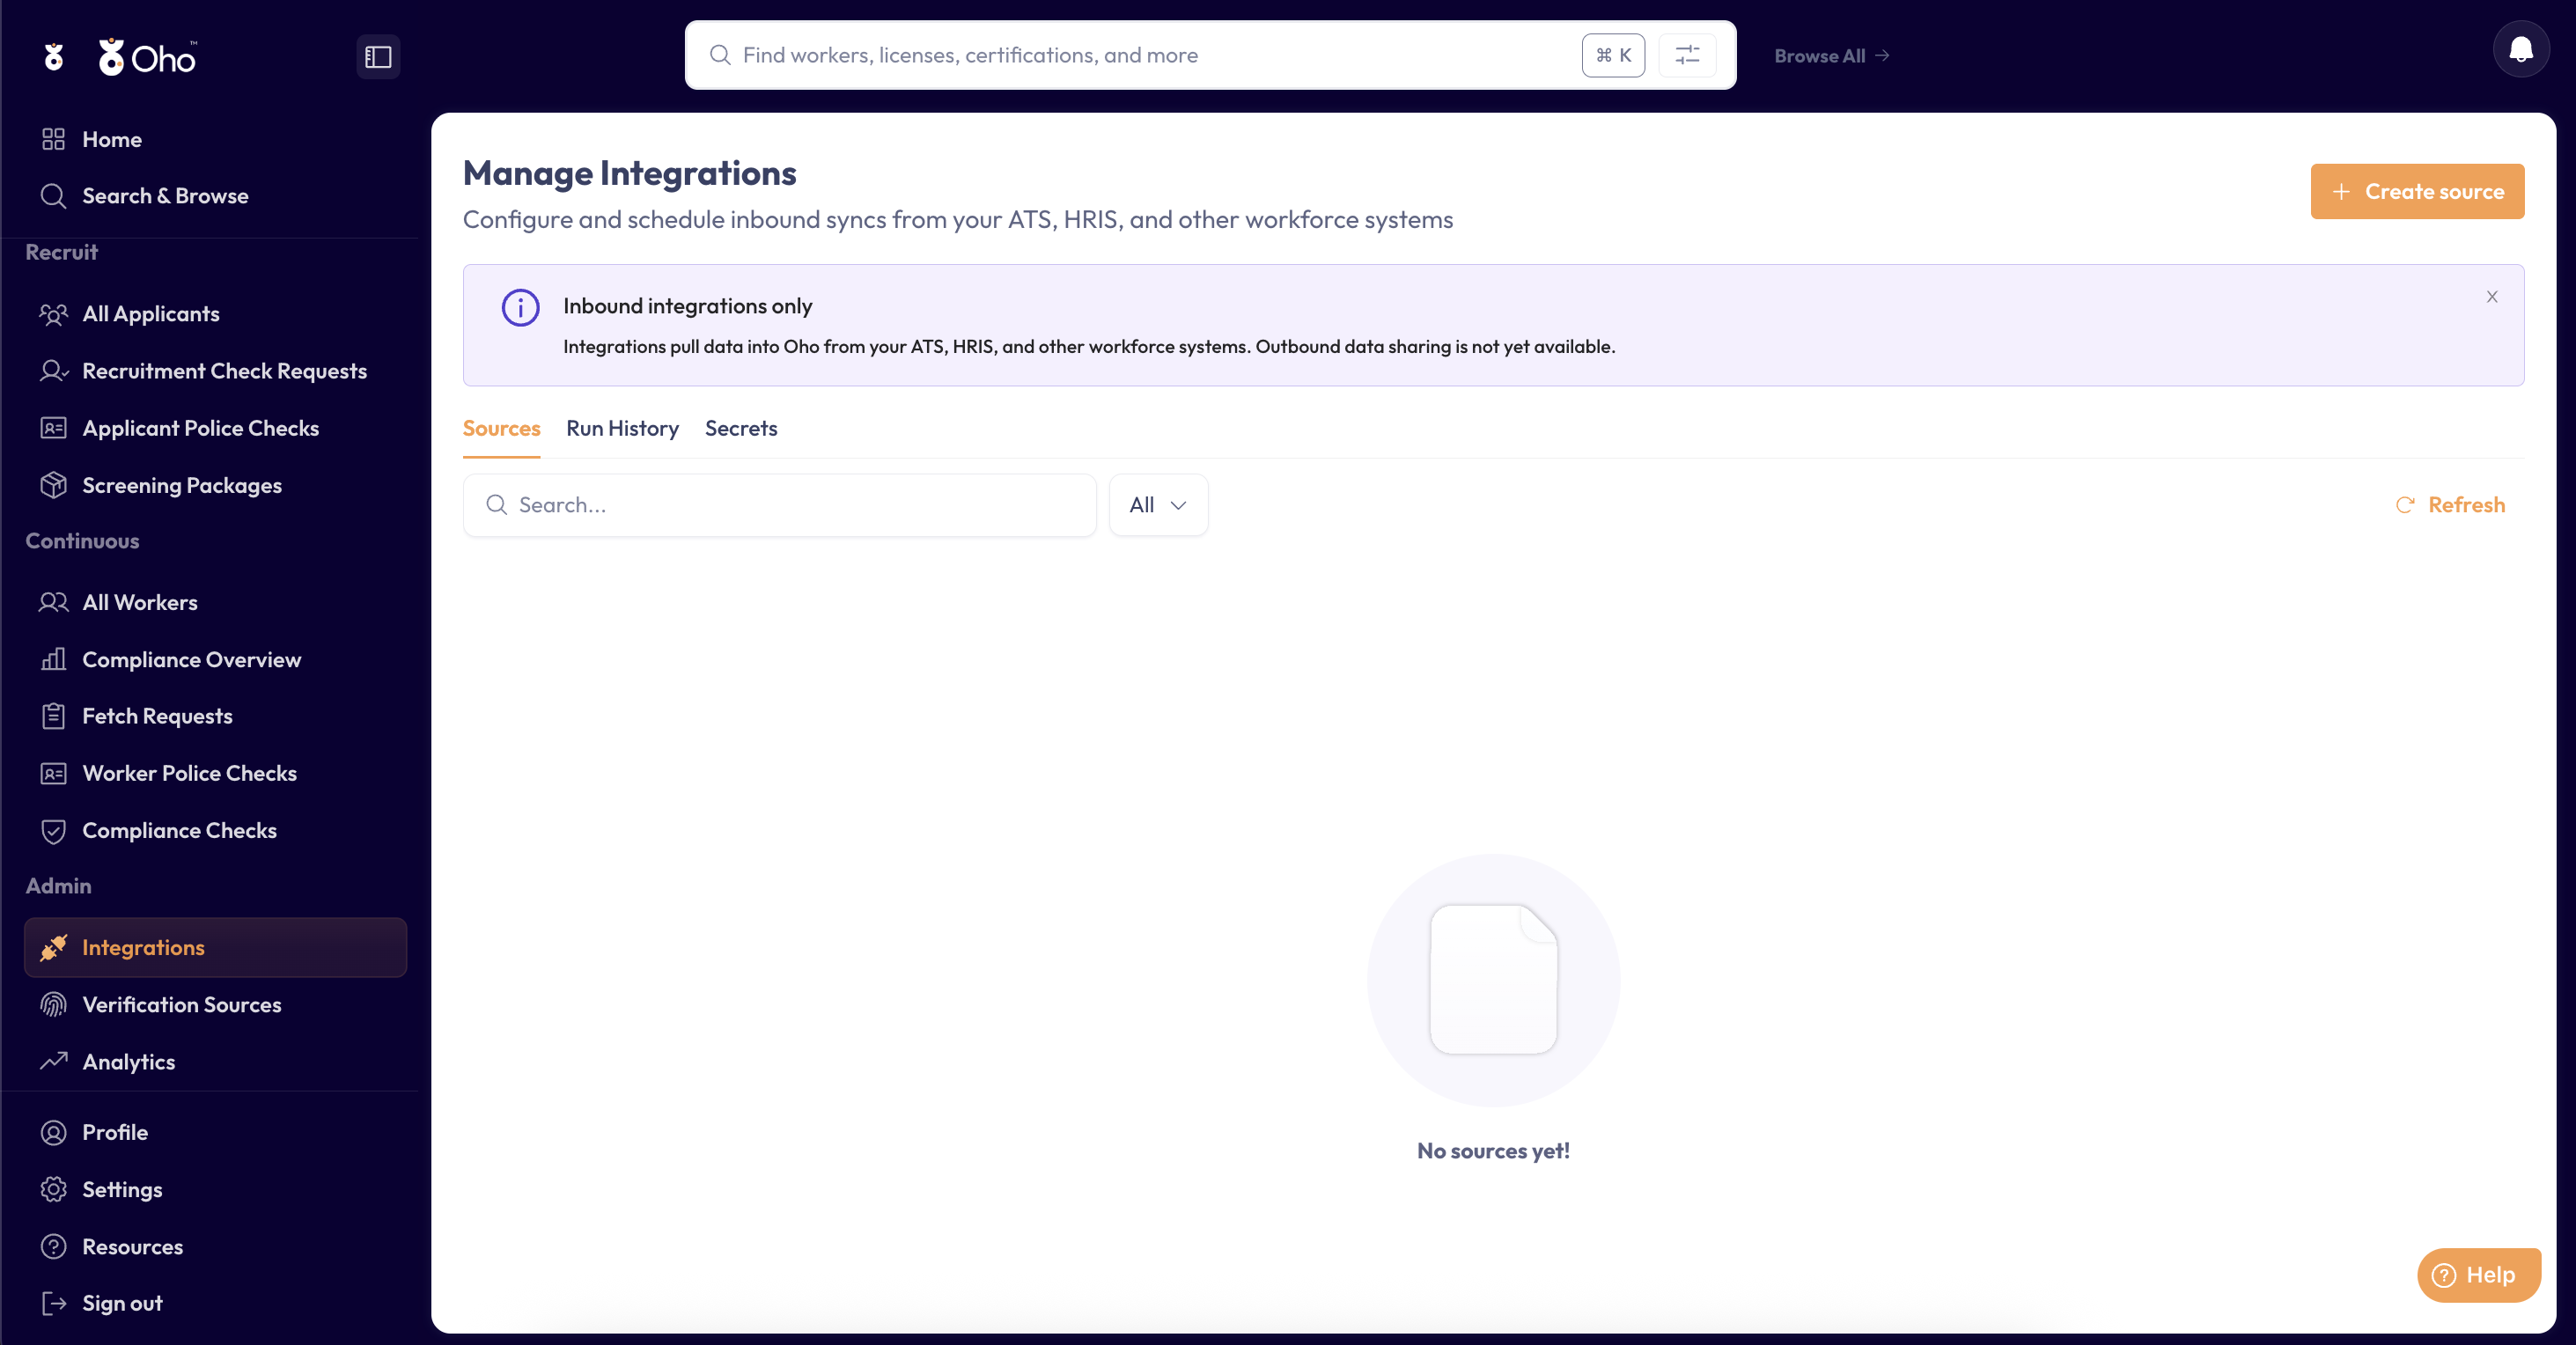
In the left menu, under Admin, open Data Sources, then start a new integration.
Step 3: Choose your source
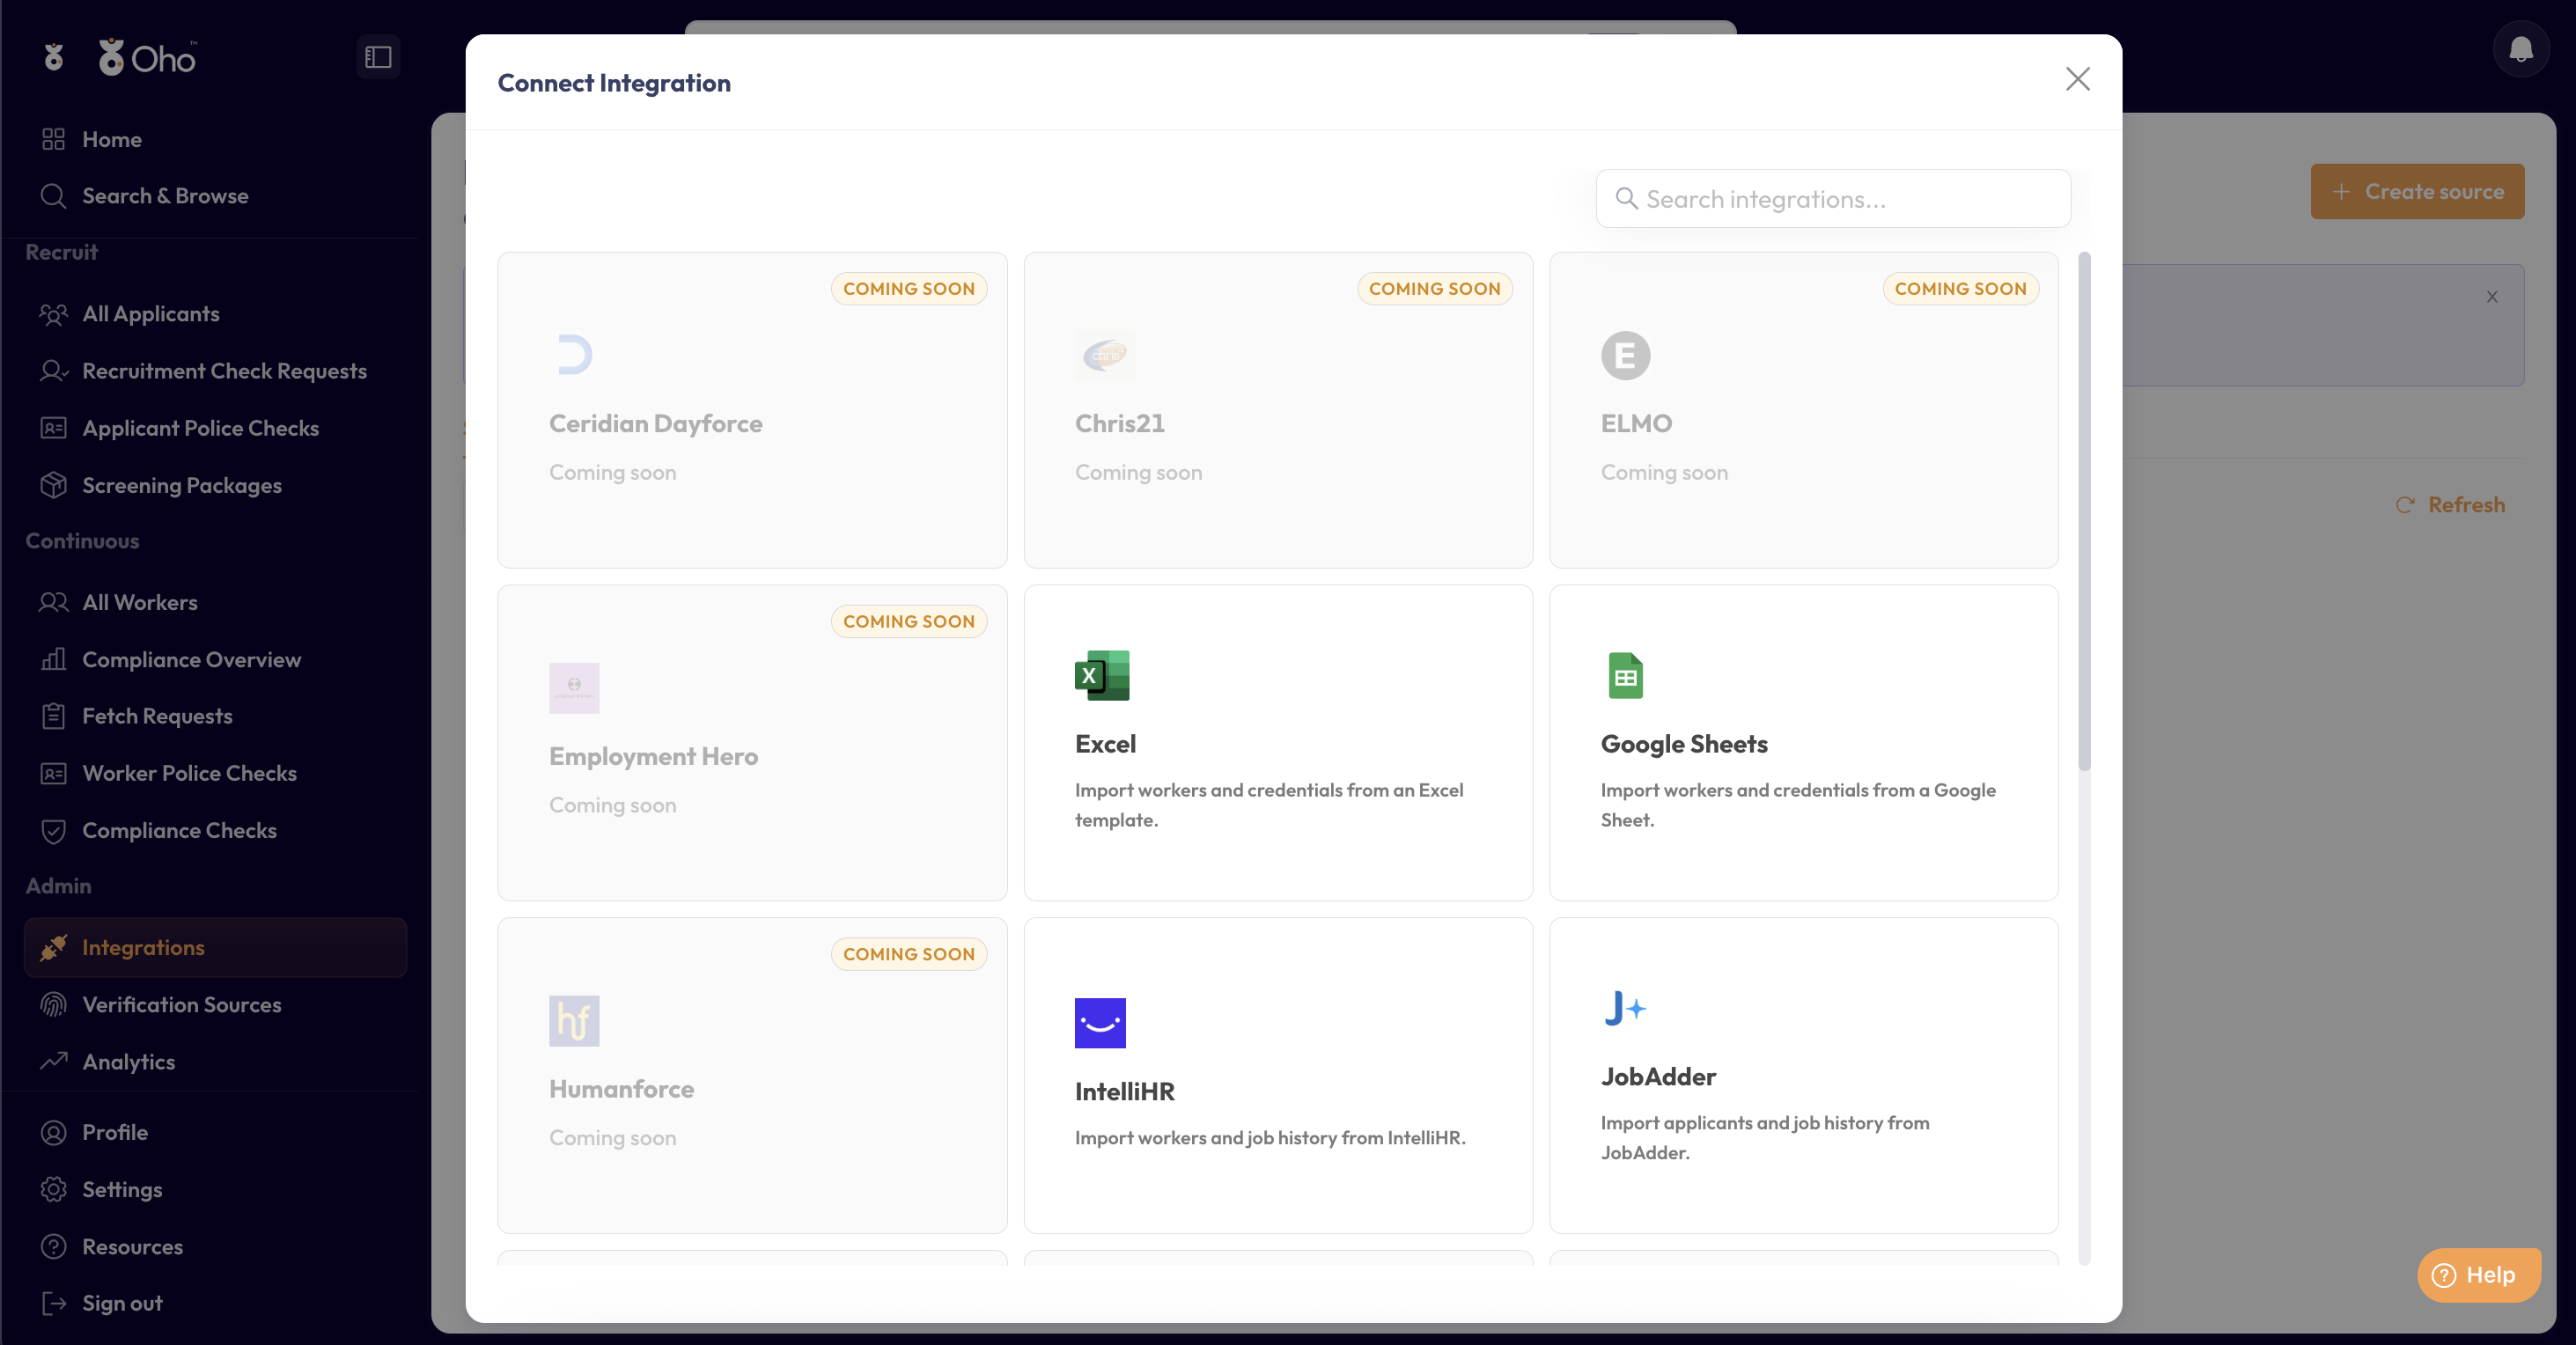
Pick Excel or Google Sheets from the list of sources.
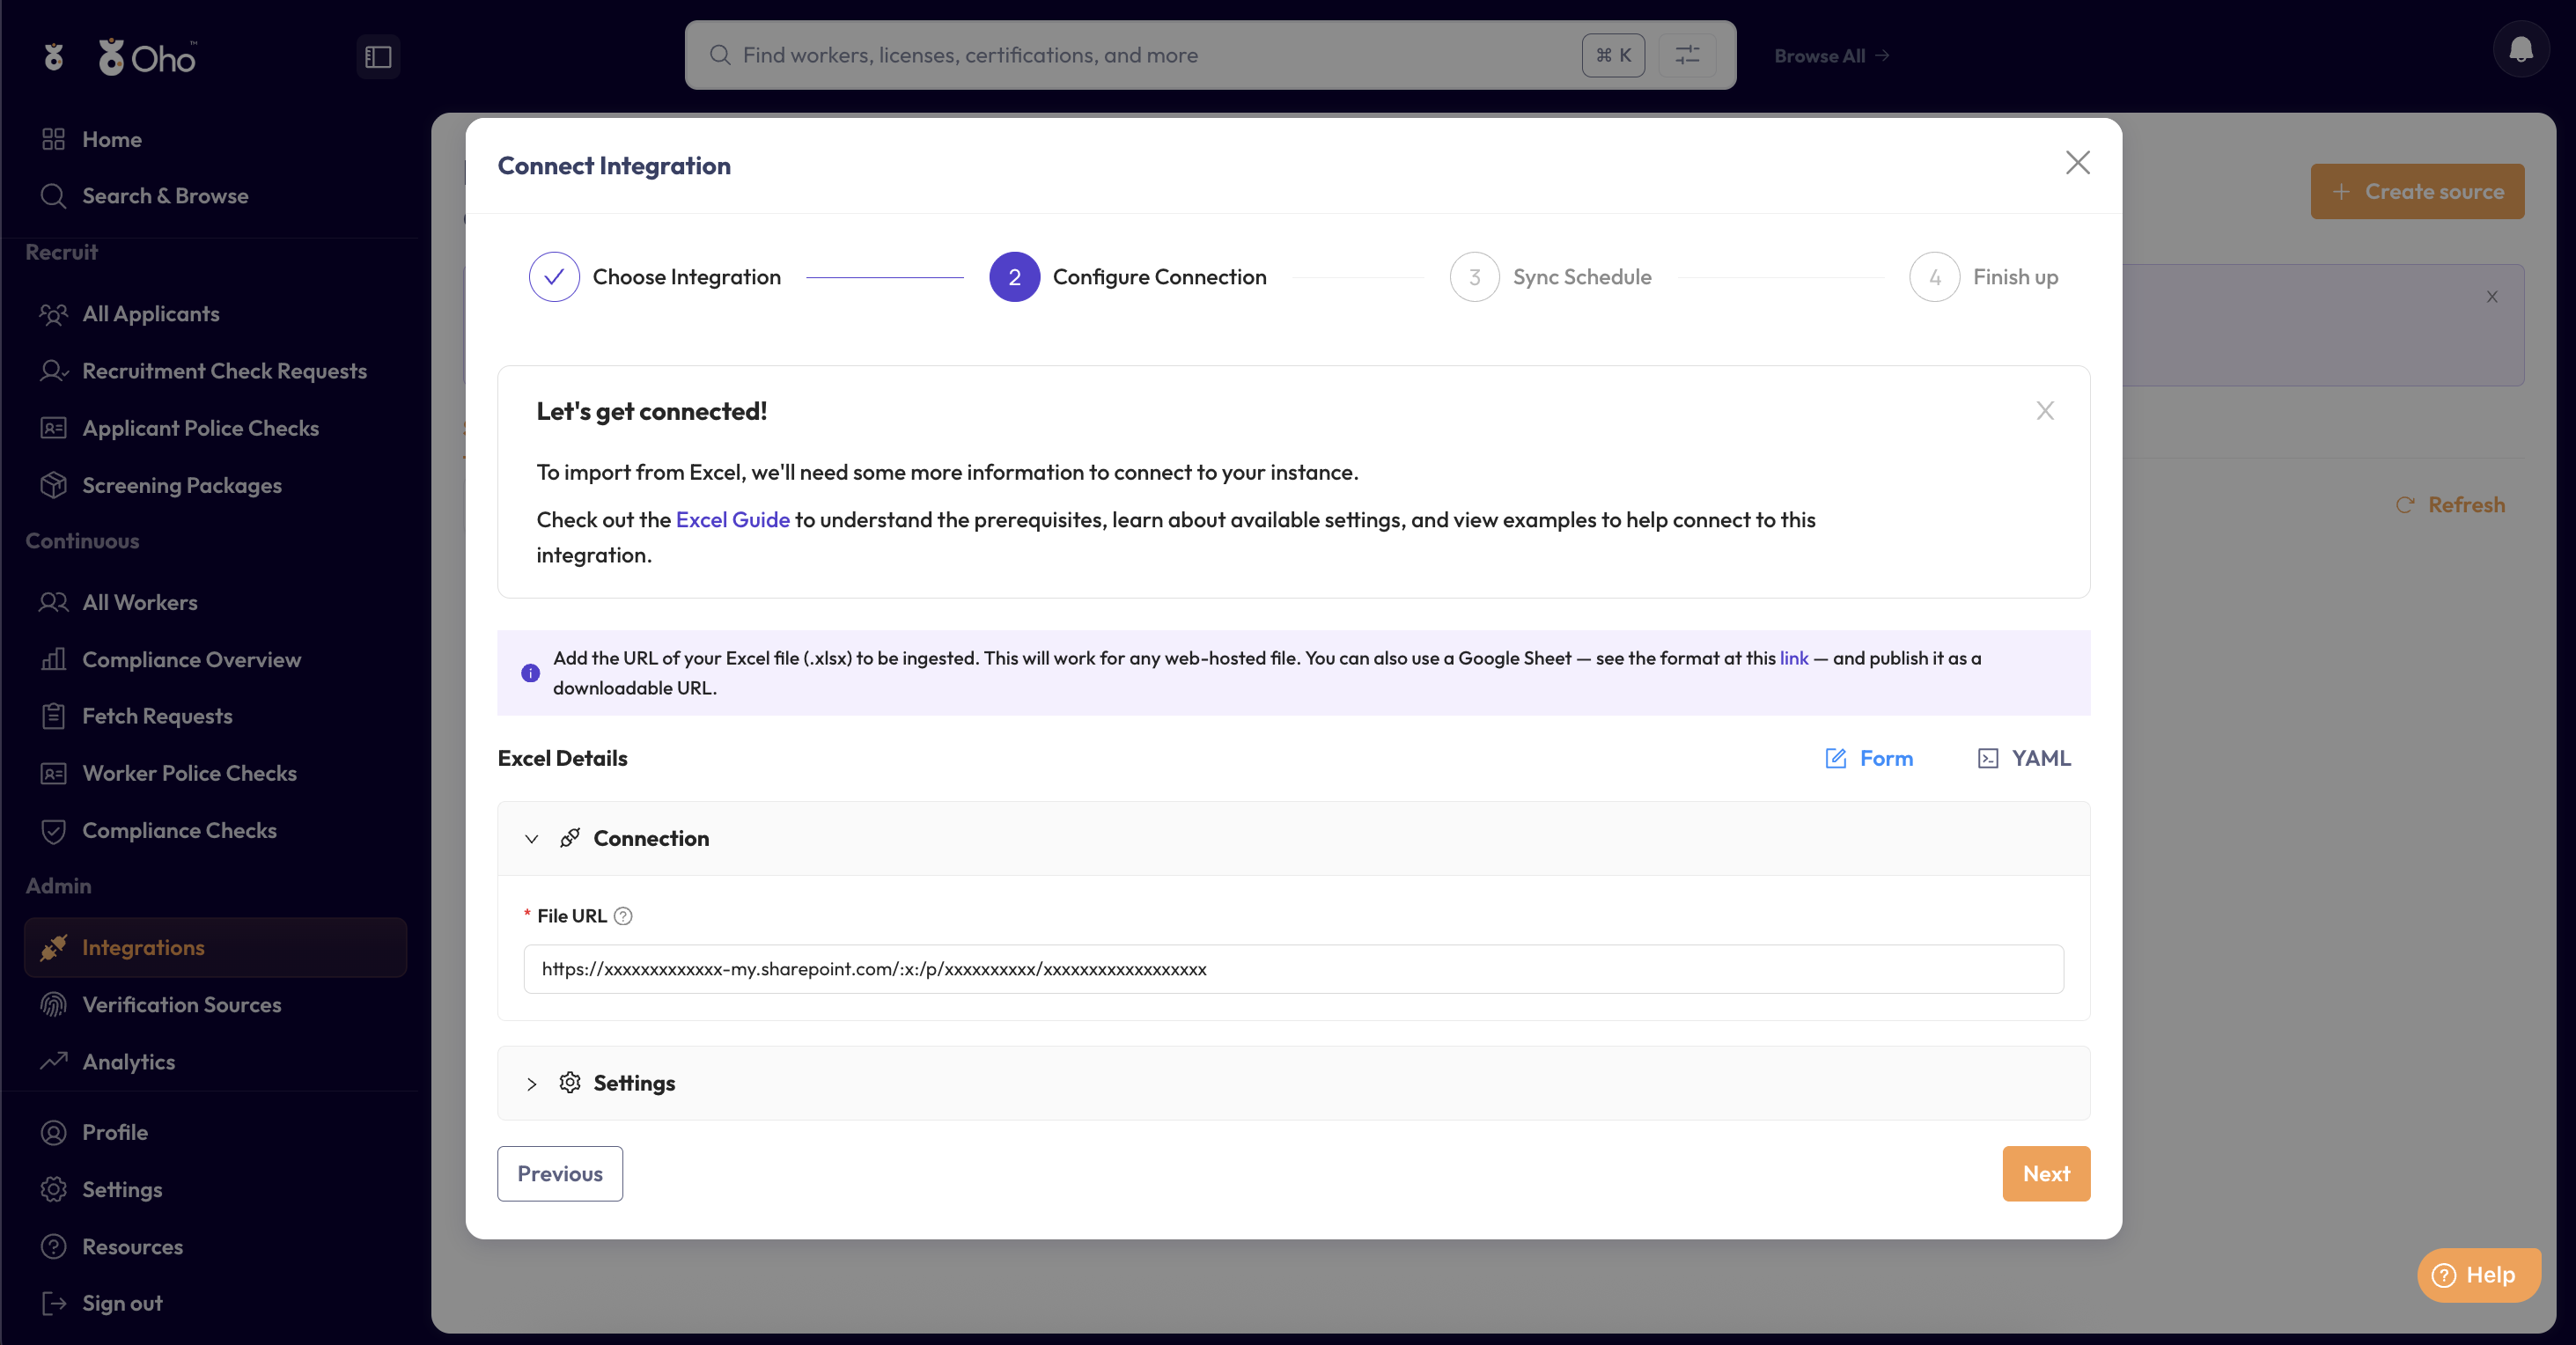
Step 4: Connect your spreadsheet
Use an Anyone with the link → Viewer link only while the import runs, then revoke it — Step 7.
Your spreadsheet holds workers' names, dates of birth, and card or registration numbers, so:
- Set access to Viewer / view-only. Oho only needs to read the file, never edit it.
- Keep the link to yourself. Don't post it in email, chat, or tickets, and don't reuse it for anything else.
- Revoke it when the import has run — Step 7.
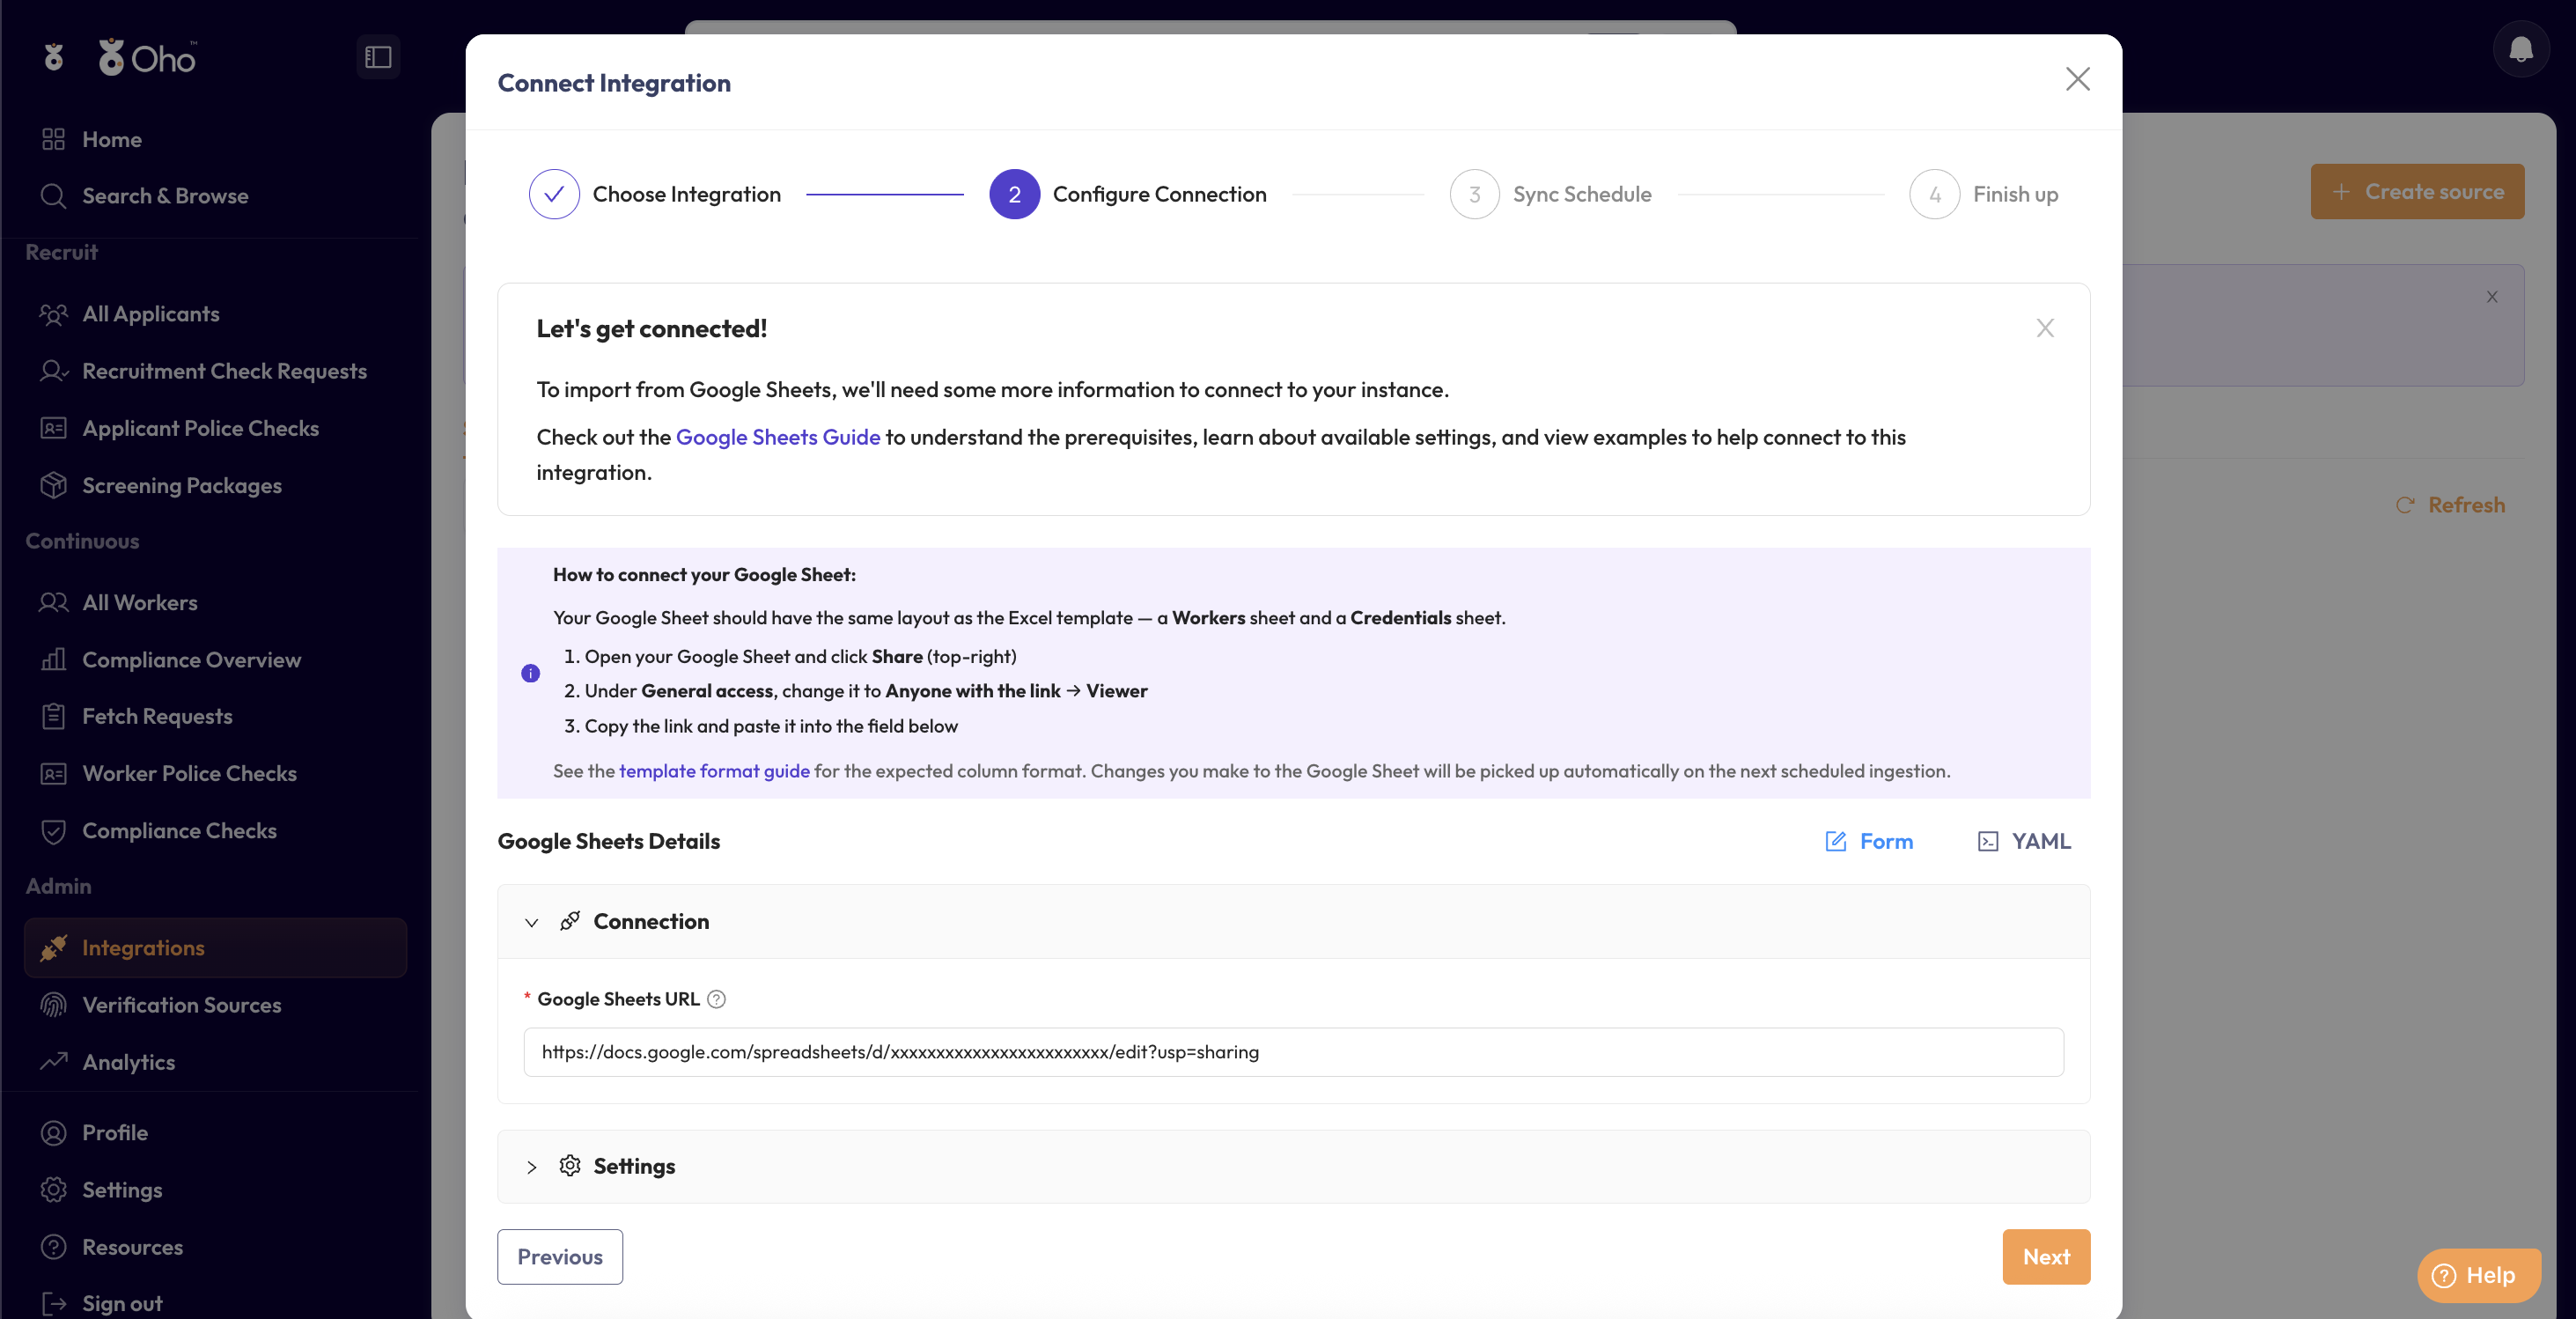
If you chose Google Sheets:
- Open your Google Sheet and click Share (top-right).
- Under General access, change it to Anyone with the link, set to Viewer.
- Copy the link and paste it into the field in Oho.
If you chose Excel:
Oho needs a link to your .xlsx file that it can reach. The easiest way to get one is OneDrive:
- Upload your completed
.xlsxto OneDrive. - Create a share link, set so anyone with the link can view.
- Copy that link and paste it into the field in Oho.
Any other web-hosted location works too, as long as Oho can reach the file — but OneDrive is the simplest. (Prefer not to host a file at all? Use Google Sheets instead.)
Why Oho needs a link anyone can open
Oho reads your file without signing in to your Google or Microsoft account, so the file has to be readable by anyone holding the URL. There's no more restricted option today, for either Google Sheets or Excel/OneDrive.
That means the URL is the only thing protecting the file: anyone who obtains it can see everything in the spreadsheet, and a forwarded or leaked link is enough to disclose it. Keeping the link view-only and short-lived is what limits the exposure.
Personal information like this carries handling obligations under the Australian Privacy Principles — see Workers → Privacy & access.
Step 5: Set how often it runs
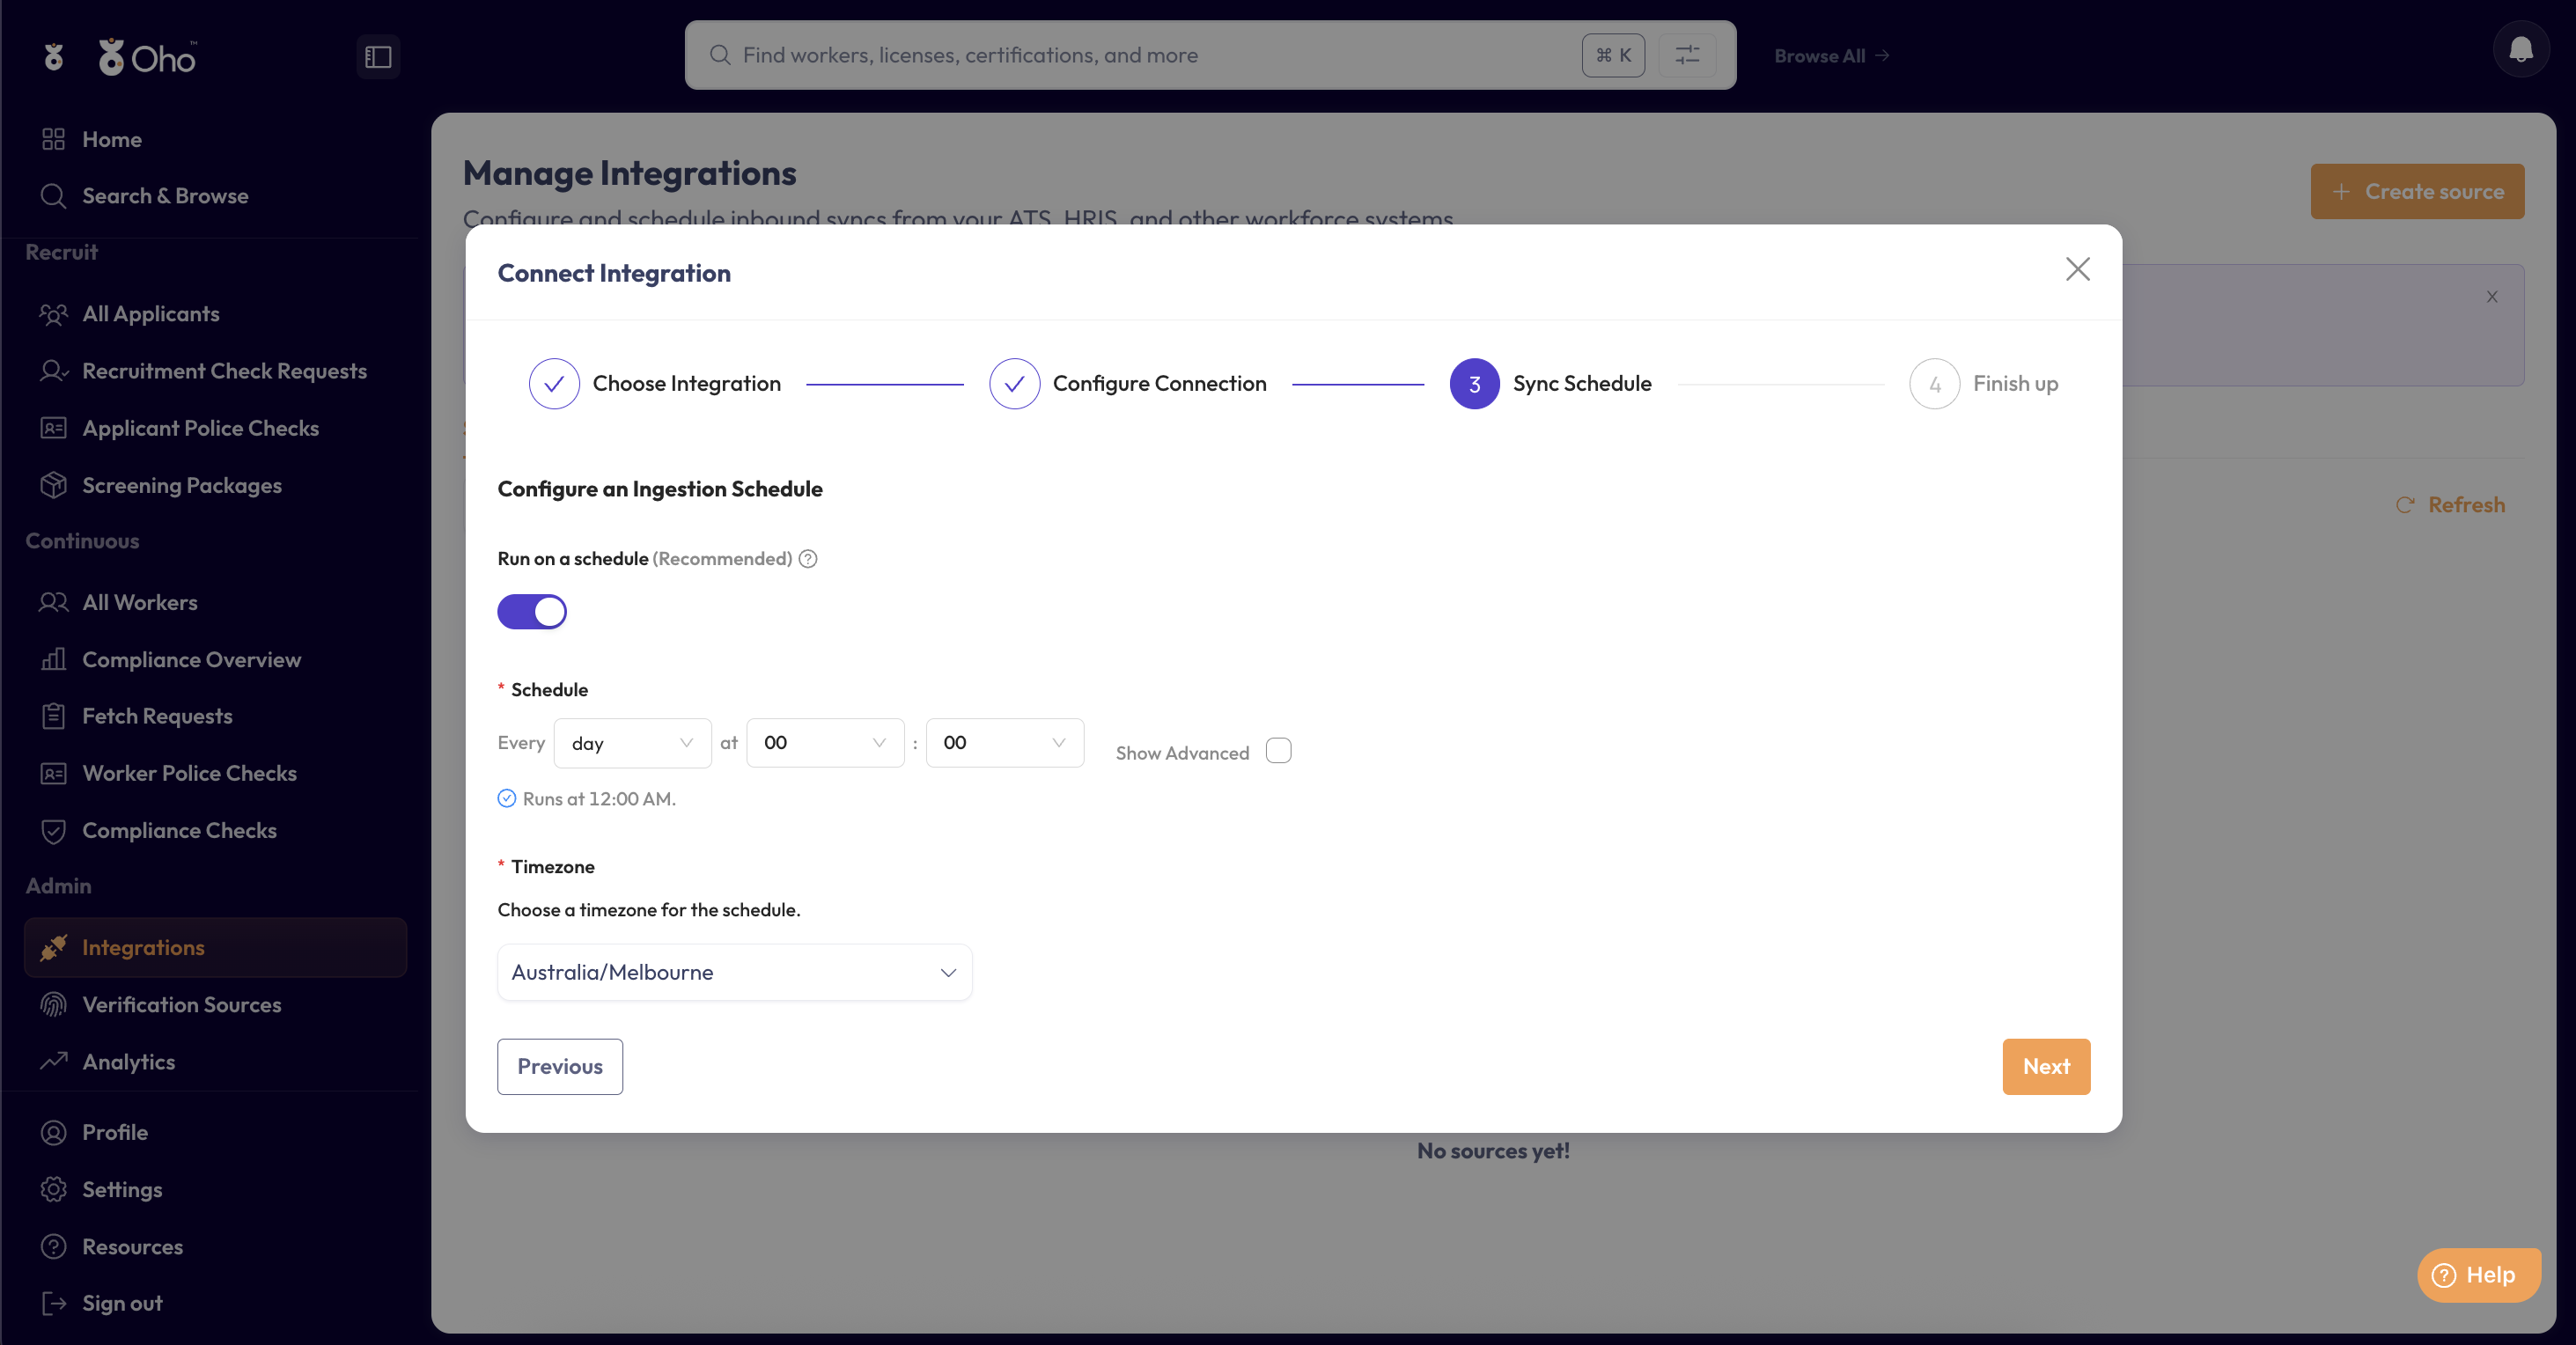
Choose a schedule. You can run the import once to get started, or have it run on a regular schedule so changes you make in the spreadsheet flow through automatically.
Step 6: Name it and save
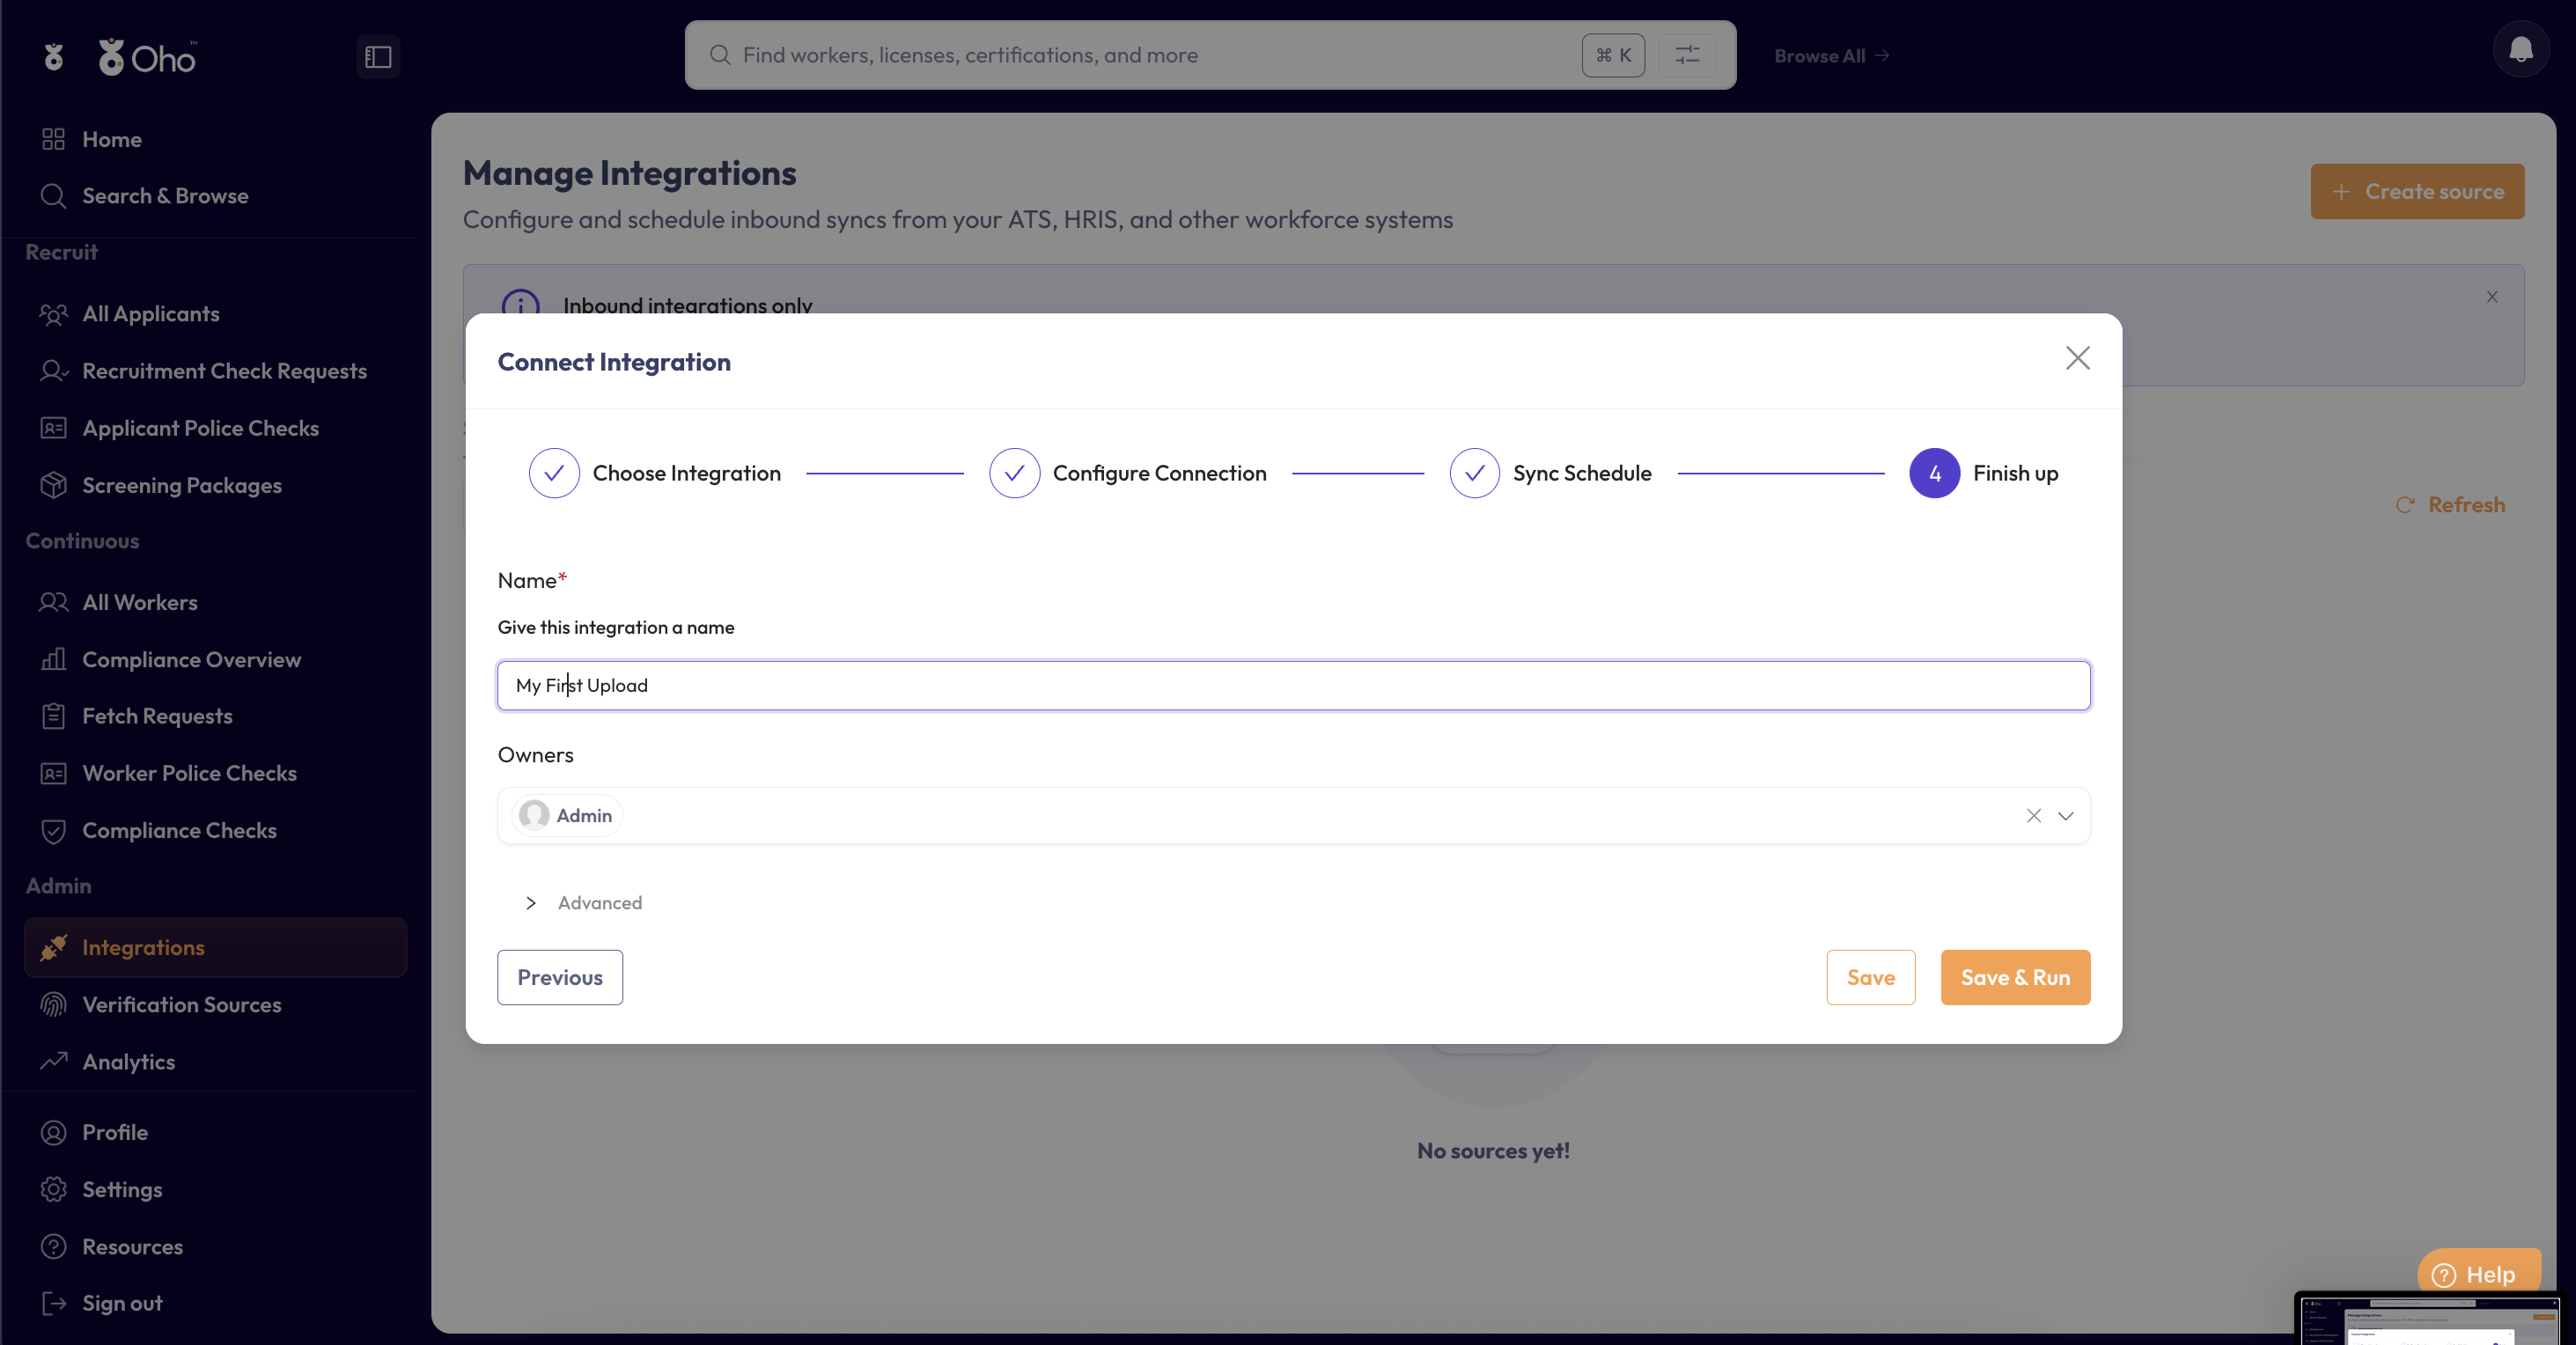
Give the integration a name you'll recognise, then save it. Oho runs the import and brings your people in.
Step 7: Lock the file back down
Now that Oho has your people, close the access you opened in Step 4:
- One-off import: revoke the link. In Google Sheets or OneDrive, set access back to Restricted / remove the link. Oho doesn't need the file again.
- Recurring schedule: the file has to stay reachable for future runs, so leave the link in place — keep it Viewer-only, store the file somewhere access-controlled, and revoke the link when you turn the schedule off.
What happens next
- Your people appear under All Workers.
- Each credential you listed is checked against its official source straight away — see One-off verification.
- To keep those checks current over time, set up Verification Sources for ongoing monitoring.
If you set a recurring schedule, you don't re-import by hand — edit your spreadsheet (or Google Sheet) and Oho picks up the changes on the next scheduled run.
Mixing a spreadsheet with records added by hand
Connecting a spreadsheet to a tenant where people have been adding workers and credentials by hand doesn't blend the two the way you'd expect. Workers and credentials behave differently, and the difference is the whole story.
Credentials do match. A credential is identified by its type and its reference number, and a spreadsheet row works that out exactly the way the Add credential form does. A credential someone typed in is therefore the same record as a sheet row for the same card, and the sheet updates it rather than adding a second one.
Workers don't. A worker is identified by the source and the Worker ID — nothing else. Email, name and date of birth are deliberately not used, because two real people legitimately share an email address and some have none at all. A worker added by hand, or brought in by an HR connector, carries no spreadsheet Worker ID, so a sheet row for that same person creates a second worker rather than finding the first.
All four ways of connecting the template — an Excel file, a Google Sheet, a file on SFTP, and a flat CSV — count as the same source, so moving your file from one to another is safe: the same Worker ID still finds the same worker. What doesn't carry across is a different kind of source, like an HR connector or a worker typed in by hand.
That asymmetry is why a Workers sheet over an existing workforce duplicates it, and why a Credentials-only sheet is worse: without its Workers rows, Oho has nothing to attach the credentials to, and they are written with no owner — invisible on every profile and still alerting as an unknown worker. If you want to load credentials onto workers who are already in Oho from another source, that's a job for support, not for the template.
Your edits aren't overwritten
Oho keeps track of fields a person changed by hand, and the import won't write over them. Instead the run reports the disagreement, and the field stays as the person left it until somebody decides. Two fields are treated more carefully still:
- Date of birth can't be changed by the sheet at all once a record has one, whether or not anyone edited it. A sheet that disagrees is either a correction or a mistake, and a person should look. The sheet still fills in a date of birth that's missing.
- Expiry date only moves forward. A later date is a renewal and the sheet is as likely as anyone to be holding the new card; an earlier one would stand a worker down for a lapse that didn't happen.
Records last written before Oho started tracking hand edits don't carry the marker, and the sheet still wins on those.
Where a record came from
Open a credential and look at Source System on its overview. You can also filter by Source System in Search & Browse to see everything one source is responsible for — the quickest way to spot a worker who exists twice under two sources.
Changing the file behind an existing connection
Editing the file URL or renaming the source doesn't re-key anything: records keep the identity they were created with, and the next run updates them as before. What matters is the Worker IDs inside the file. A new file with a different numbering scheme is a new population as far as Oho is concerned, and you'll get a second copy of everyone.
Common questions
My Google Sheet import found nothing. Check that sharing is set to Anyone with the link → Viewer, and that you pasted the sheet's link (not a screenshot or a private URL).
Some rows didn't import. Check the three things Oho actually refuses a row for: a blank Worker ID (or Applicant ID), a row with no name at all, and — on credential and exemption rows — a blank Reference Number or a Credential Type Oho doesn't recognise. Also make sure the column headings still match Oho's template, and that each credential or exemption row carries a Worker ID that appears on the Workers sheet.
The same person came in twice. Their Worker ID changed between runs — most often because the column was re-typed or re-numbered. Oho matches on Worker ID, so keep it stable for the life of the person's record. A Worker ID that only lost its leading zero (02579 → 2579) is recognised as the same number and won't duplicate, but format the column as Text anyway so the value you can see is the value Oho stores.
I don't see Integrations. This is an admin area — if it's not in your menu, ask an admin in your organisation, or contact support@weareoho.com.
Related
- Integrations — all the ways to bring data into Oho
- Spreadsheet column reference — every column in the template, and which are required
- How Oho Works — the journey from import to ongoing compliance